How to Make a Wire Pulling Head: 4 Pro Methods for Electricians
Master the art of the wire pulling head. Learn the "ripcord" trick, back-wrapping for hitches, and 4 pro methods to ensure your next pull has zero failures.
Lee Brandt
1/26/20268 min read

Mastering the Wire Pulling Head
You’ve set up the spools on jack-stands, vacuumed the mouse through, pulled the rope in, guarded any sharp edges, and the tugger is braced and ready—but the most critical link is still missing. Now you have to build the head.
Don't wing it here. A failed connection halfway through a long pipe run doesn't just waste time; it can mean snapped rope, damaged conductors, or a back-straining afternoon trying to fish out a wedged bundle of cables. Whether you are using crimped-on pulling eyes, mule tape, or Kellem grips, here is the professional way to build a wire pulling head that actually holds.First things first, how are you going to connect to the pull rope?
There's 4 main methods of attaching the wire that we see in the Electrical Trade:
Crimped-on pulling eyes. This is a fairly secure and quick method. If you have them, great!
Tie Directly to the Pull Rope. This is probably the most common scenario we see in the field.
Woven Wire Pulling Socks. These spring steel contraptions look and function similar to the Chinese Finger Trap toys we've all played with. You stick the wire in easily, but the harder you pull away, the more it grips.
Braided Copper Strands Eye Stripping the insulation and weaving the conductor strands together to make your own pulling eye.
1: Organizing the Bundle
If you are pulling multiple wires, you must ensure they act as a single unit so nothing slips. For each method of attachment, this is done somewhat differently.
Method A: Crimped-On Pulling Eyes
This is one of the cleanest and easiest methods, but it still requires a bit of strategy.
The Stagger: Usually, factory-made pulling eyes come in varying lengths. Arrange them so the crimps are staggered; this keeps the "head" slim so it doesn't get stuck in a Condulet or a tight offset.
The Ground Wire: Often, the ground doesn't have a crimp-on eye. To secure it, strip the insulation and braid it into an eye, or tie a Schwäbisch Hitch around the main bundle and connect it to your central point.
The Connection: Secure all eyes to a rated Clevis or Swivel. If you’re using Mule Tape, thread the tape through every single eye before tying a Bowline Knot.
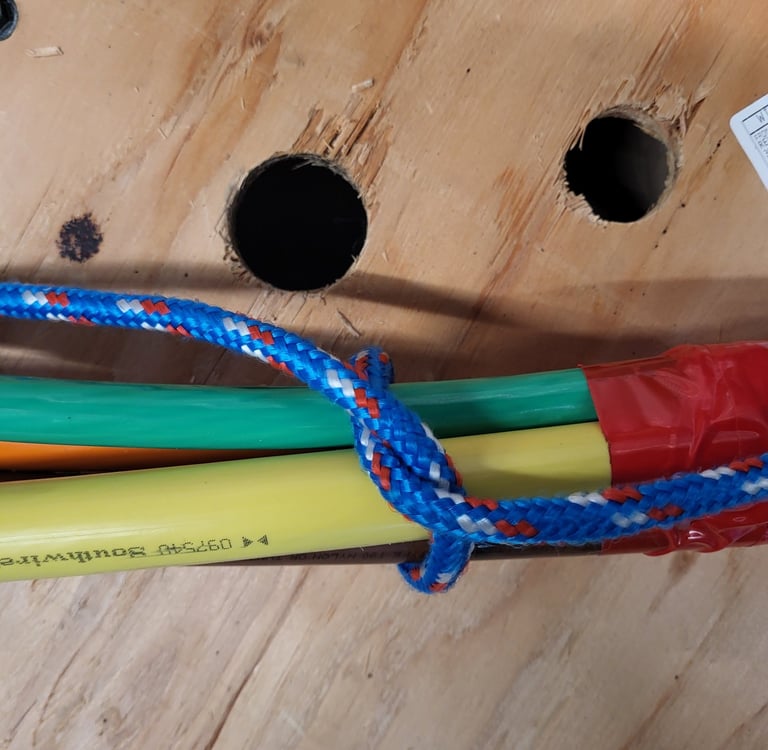
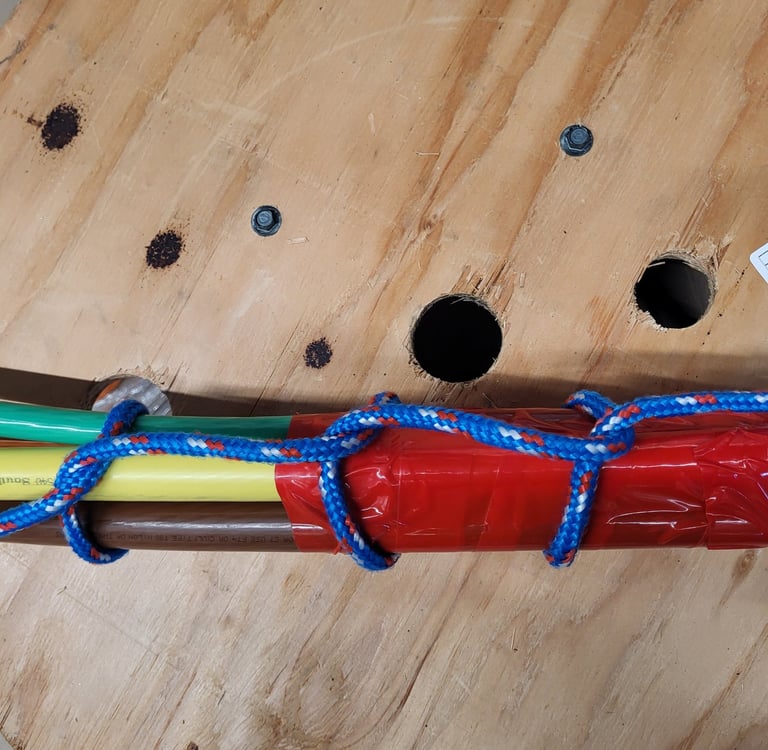
Method B: The Direct Tie (Hitch Method)
When you’re tying the rope directly to the copper, the "shape" of the bundle is everything.
The Taper: Do not cut all wires to the same length. Stagger the ends 1–2 inches apart. A tapered head "finds" the center of the conduit and flows through fittings rather than slamming into the edges.
The Stabilizer Wrap: Use a few wraps of heavy-duty tape about a foot back from the head to lock the bundle together before you start your hitches.
The "Stopper" Knot: If your ground wire is smaller than your hots, it’s prone to slipping. Pull the ground a foot longer than the rest, tie a simple Overhand Knot, and tuck it into the center of the bundle. The knot acts as a physical "stopper" that can't pull through the hitch.
Hitch It Up: Take your pull rope or mule tape, and 2-3 feet back from the shortest conductor, tie in either a Schwäbisch Hitch or an Icicle Hitch. I prefer the Schwäbisch as it takes less rope, is easier to tie, and is slightly less bulky... but as long as there's room in the conduit, it's your choice here. Finish either method by wrapping in a single Half Hitch about 6" back from the shortest conductor. This will help guide the head around turns and fittings.
Method C: Woven Wire Pulling Socks (Kellem Grips)
Also known as wire mesh grips or "finger traps," these spring-steel tools are incredible for heavy pulls. They work on a simple principle: the harder you pull, the tighter they grip.
Bundle and Secure: Gather your conductors with the ends perfectly even. Secure them with two separate, tight wraps of electrical tape to keep the bundle from shifting while you slide the sock on.
The "Stopper" Ground: Just like the direct tie method, position your ground wire in the center of the bundle. Pull it an extra few inches and tie a small stopper knot. This ensures the ground can’t "walk" out of the mesh under tension.
Watch for "Whiskers": If your pulling sock isn't brand new, handle it with heavy gloves or a thick rag. Over time, these grips develop "whiskers"—tiny, broken steel strands that will easily pierce your skin.
Compress to Load: To get the sock on, push both ends toward the middle to increase the diameter (opening it up), then slide it over the bundle.
Work the Sock (The "Caterpillar" Method): On longer grips, you won't be able to slide the whole thing on in one motion. Instead, use a "caterpillar" technique:
Compress the mesh at the head to open it up.
Slide those first few inches onto the bundle.
Grip the slack and "push" it down the wires, moving a few inches at a time until the sock is fully seated.
Note: Ensure the mesh is pulled tight and smooth once it's on; any "bunched up" mesh can snag on conduit edges or allow the conductors to slip.
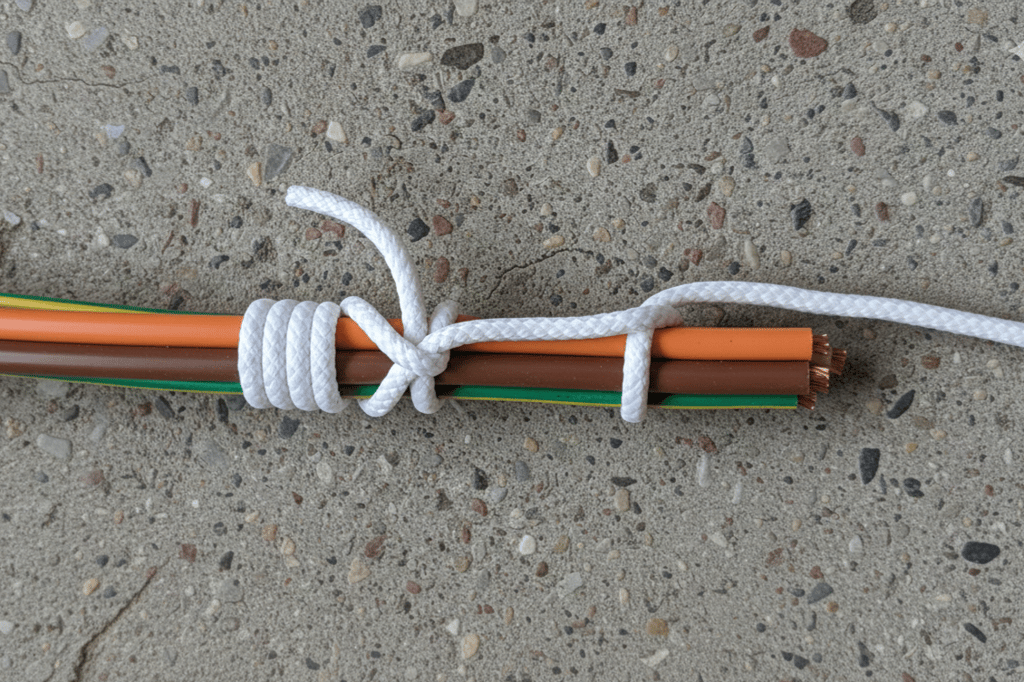
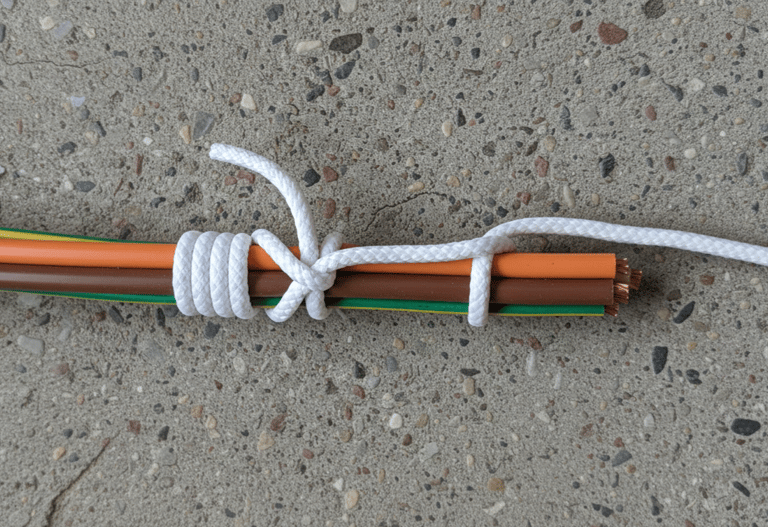
Method D: Creating a Braided Pulling Eye
For heavy-duty pulls—especially with large conductors like 250–1000 kcm—a braided eye is the gold standard for security. This method turns the wire itself into a high-strength pulling loop.
Critical Note: This method only works with stranded copper conductors. Never attempt this with aluminum, as the strands are too brittle and will snap under the tension of the braid.
1. Strip the Insulation
To have enough "tail" to braid properly, you need to strip back a significant amount of insulation. Use these general guidelines:
Up to #6: 12 inches
Up to 4/0: 24 inches
250–1000 kcm: 36–48 inches
2. Taper the Bundle
If you are pulling multiple conductors, do not strip them all at the same point. Stagger your insulation cuts by 3–4 inches. This creates a natural taper that helps the head navigate around tight bends and fittings.
3. Manage the Bulk
If your conduit fill is tight, the added bulk of a braid can be a problem. You can trim away approximately 25-50% of the strands from each conductor before starting your braid. You can choose to trim the outside strands as they are easy to cut with a bandsaw or pliers, or you can try and snip the inside strands to keep a smoother transition. Do whatever works. This step keeps the diameter of the "eye" and doubled-over sections slim without sacrificing the integrity of the pull.
4. The Weave
Separate the strands into two equal "ribbons."
Pass the two ribbons through your Clevis or pulling rope loop from opposite directions.
Fold them back against the main conductor.
The Braid: Wrap the two sections tightly around the main conductor in a spiral, moving in opposite directions (like a DNA strand).
Secure the Tail: Use a tight wrap of electrical tape at the base of the braid to ensure the ends don't catch or unravel.
2. Taping for Speed and Removal
How you tape the head determines how easily it slides through the pipe—and how much you’ll struggle to take it off later. Now that you've attached the rope, let's look at the "secret sauce" to a perfect finish.
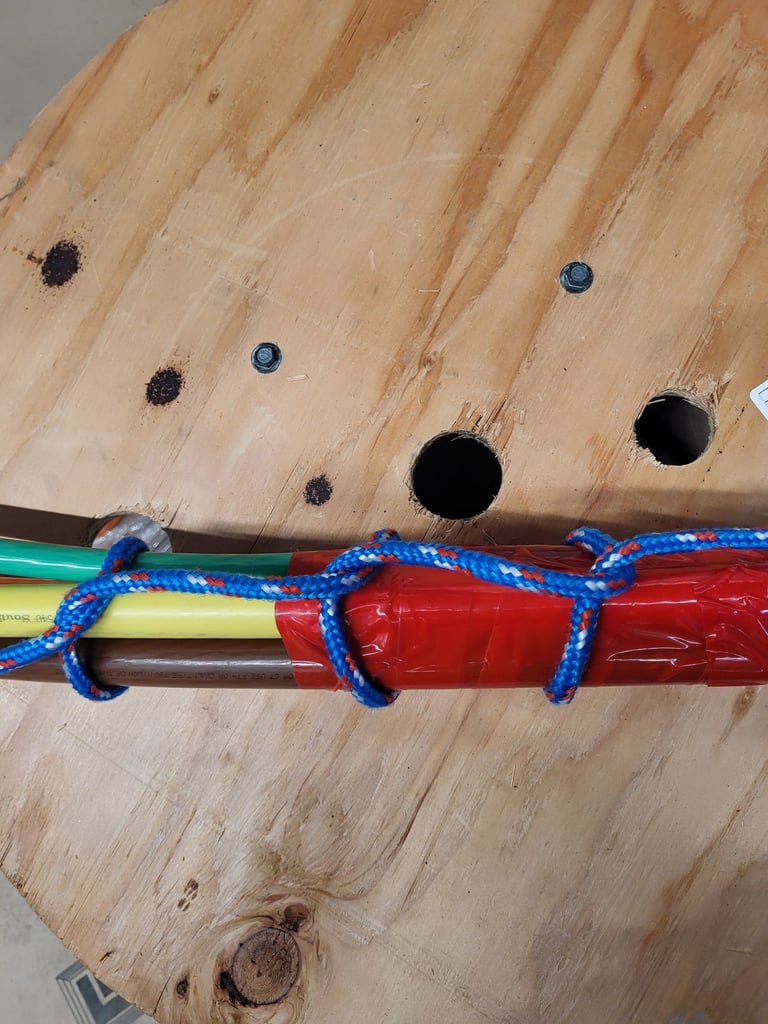
The Smooth Transition (The "Nose Cone")
For a truly snag-free head, don't leave a "shoulder" where the rope meets the wire. Use a rag or a folded piece of cardboard to create a tapered "nose cone" from the pulling rope down to the conductors. This prevents the head from dead-ending against the edge of a fitting.
The "Ripcord" Trick
This is the ultimate time-saver.
Attach a length of jetline, tie wire, or Mule Tape to the clevis or pulling eye.
Let it hang about a foot below your final taping point.
Tape over it normally.
When the pull is done: Simply grab the "ripcord" and pull it toward the head. It will slice through the electrical tape like a zipper, letting you peel the head apart in seconds without reaching for a knife.
The Backwrap Method (Sticky Side Out)
This is a game-changer for two reasons: it makes removal easier, and it allows your knots to work properly.
The Technique: Start with a few standard wraps to secure your transition rag. Then, reverse the roll so the sticky side faces out as you unspool. Backwrap all the way past your hitch or crimps.
Why it matters: Hitches (like the Schwäbisch Hitch) and woven socks need to be able to "stretch" and "bite" to grip the wire. If you tape them down with the sticky side against the mesh or rope, you can actually inhibit their gripping power and cause a failure.
The "Snake-Skin" Finish
Finish the head by flipping the tape back to sticky-side down for one final layer. Overlap the wraps toward the head (like fish scales). This creates a smooth, low-friction surface that won't peel back or "roll up" as it slides through the conduit.


Pro Tip: The "Anti-Snap" Back-up
In long conduit runs, tension can "bounce" or go slack, especially around 90s. When a mesh grip goes slack, it can spring right off the wire. Instead of relying on flimsy tie wire or tape, do this:
Tie a Schwäbisch Hitch with Mule Tape around the conductors about a foot past the end of the sock.
Thread the tape through the last few sections of the mesh.
Loop it back and secure it to your tag end with a Sheet Bend or Double Fisherman’s Knot.
This creates a safety tether that keeps the sock seated even if the pull gets jerky.
Conclusion: Build it Right, Pull it Once
At the end of the day, a wire pulling head is only as good as the thought put into it. Whether you’re using factory-made eyes for a clean install or braiding a custom head for a high-tension 500 kcm pull, the goal is the same: Zero failures.
By taking the extra five minutes to taper your bundle, use a ripcord for easy removal, and "backwrap" your tape to allow your hitches to bite, you aren't just making the job easier—you’re protecting the wire and ensuring the project stays on schedule.
Master Your Rigging Skills
The head is only half the battle; the knots you use to connect your rope are just as vital. If you haven't mastered the Schwäbisch Hitch, the Bowline, or the Sheet Bend yet, head over to our Knots section to see step-by-step videos on the most reliable hitches in the electrical trade.
Have a "secret" method for building a head that we missed? Drop a comment below or reach out to us—we’re always looking for better ways to move wire.
Safety Disclaimer: ⚠️ Material Handling Only
The knots and techniques demonstrated on this site are intended strictly for material handling, wire pulling, and equipment securement. > Never use these hitches and knots for life safety, fall protection, or overhead lifting of loads where a failure could result in injury or death. Always use OSHA-compliant, load-rated hardware (harnesses, shackles, and slings) for critical lifts. Your safety team is there for a reason—consult them for high-risk tasks. Master the craft, stay out of pinch points, respect the load, and live to tie knots another day.
Questions or tips? Reach out anytime. I would love to hear about new knots and techniques.
Check out my YouTube channel for knot tying, rigging tips, and other electrician related tutorials.
© 2025. All rights reserved.
I made this website by myself with Hostinger Website Builder. Try it and start building your idea, today.